


PVC wall covering Shower System "Mural Calypso" installation instructions
PVC wall covering Shower System "Mural Calypso" installation instructions
Installation instructions MURAL ULTRA DESIGN / MURAL CLUB / MURAL CALYPSO / MURAL PLUS
1 – Substrates
The substrate must comply with local standards. Check for flatness and straightness and correct if necessary.
2 – Wall preparation
The substrate must be free from moisture, mould and traces such as marking lines, ink, pencil or graffiti. A primer suitable for the substrate and adhesive must be applied to the surface to achieve a uniform and regular porosity. When installing equipment on the wall, such as a wall-mounted toilet, the wall must be reinforced beforehand to ensure a secure attachment of the equipment. This is done by using two BA 13 panels or BA 25 panels or BA 18 extra-strong panels glued together. If a separate reinforcement solution is not made for a wall-mounted toilet, there is a risk that the wall covering material may bubble at the joint between the toilet and the plasterboard. This is due to the tightening of the fasteners and the gradual flexing of the substrate. As a solution, the contractor can choose and add a rigid board, which improves the rigidity of the wall and reduces the risk. When preparing the plinth for the overlap, the difference in thickness is levelled with putty or a special levelling profile.
3 – Installation
3.1 – Cutting the material
Leave a gap of 1–1.5 mm between the rolls to allow for grooving with a triangular scraper.
3.1.1 – Vertical installation
3.1.2 – Horizontal installation
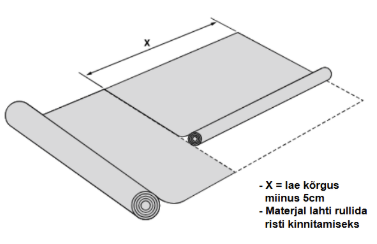
The rolls must be pre-cut to the required width and length.
3.2 – Material attachment
- Minimum substrate temperature: 10 °C
- Minimum room temperature: 10 °C
Leave the covering material at the installation temperature (15 °C) for at least 24 hours.
3.3 – Marking the first vertical line
3.3.1 Vertical installation
- Mark the first vertical line.
- Welding or joints must be on the inside corner.
- Mark another vertical line across the width of the panel to determine the area to be glued.
3.3.2 Horizontal installation
Mark a plumb line at the height, depending on the chosen finishing method (overlay or welding with a base).
3.4 – Gluing and installation
The wall covering must be glued with a strong acrylic adhesive, taking into account the weight of the covering. The adhesive is applied evenly to the surface with a fine-notched A4 type spatula (TKB specification) in an amount of 180–200 g/m². The surface is then rolled with a medium-pile paint roller to ensure even adhesion and a smooth finish.
NOTE
- Strictly follow the adhesive manufacturer's instructions, paying particular attention to the waiting time.
- The adhesive consumption and spatula type are recommended by Gerflor.
- To achieve perfect adhesion, the room temperature and humidity, the absorbency of the substrate, and the amount of adhesive used are important.
- Too short a waiting time will cause bubbling.
- Too long a waiting time will impair the transfer of the adhesive to the covering material (diagram).
- When gluing, two layers of glue must not overlap, e.g. if the work is interrupted and continued later.
- The first panel must be installed on a vertical line, the following panels are placed accordingly.
3.5 – Corners
3.5.1 Internal corner
Glue the CA12 welding rod to the corner before installing the cover. 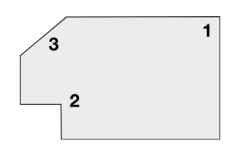
3.5.2 Outer corner 2
There is a risk of the wall covering becoming dull/fading.
Recommendation:
- Cut the covering material at the corner and secure it with a stainless steel corner protector (see chapter 3.8.7).
- Or bend the corner with a stone string or paper string before gluing the wall covering.
3.5.3 Rounded outer corner
If the outside corners are rounded or formed with outside corner profiles, the wall covering can be glued and installed without cutting.
3.5.4 Obtuse angle (>90°) 3
Use a dispersion-based contact adhesive (e.g. Uzin WK 222) or special double-sided tape (Remur).
Do not use solvent-based neoprene adhesive. 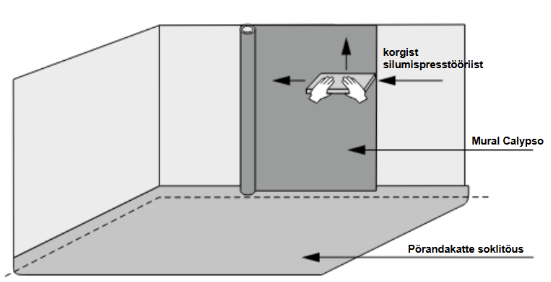
3.6 – Unrolling
Remove air from the center of the panel towards the edge using a pressure block.
3.6.1 Outer corner
- Glue up to the corner.
- Press the material into the corner and cut or heat lightly to turn around the corner.
3.6.2 Internal corner
- The material is placed on the CA12 profile.
- Glue up to the corner.
- Fold back to follow the shape of the profile.
- Press with a corner roller.
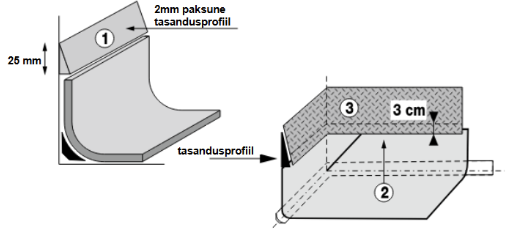
3.7 – Connection to the floor covering
3.7.1 Plinth overlay
The wall covering material covers the plinth rise of the floor covering by at least 3 cm. Acrylic adhesive or adhesive tape is used to attach the wall covering to the plinth.
- The edge of the wall covering is leveled with putty or a leveling profile.
- The covering material is protected with masking tape with a 3 cm overlap when using acrylic adhesive.
- The adhesive tape is applied to the leveling profile with an overlap of up to 3 cm or the adhesive is applied to the masking tape; remove the masking tape before attaching the wall covering.
The overlay is attached to the skirting board by heating it with a heat gun and pressing it flat with a flat roller.
3.7.2 Welding with floor plinth
- Only possible with MURAL ULTRA DESIGN + homogeneous/heterogeneous ≤2 mm.
- Remove glue residue, weld with Rapid ultra nozzle.
This solution is ONLY possible with MURAL ULTRA DESIGN coating material and a homogeneous or heterogeneous product with a maximum thickness of 2 mm.
- All adhesive residue must be removed from the chamfer with a triangular scraper.
- The weld must be completely melted to ensure long-term strength of the joint.
- Use the Rapid Ultra nozzle.
- Follow the recommendations given in chapter 3.7.3.
3.7.3 Processing joints 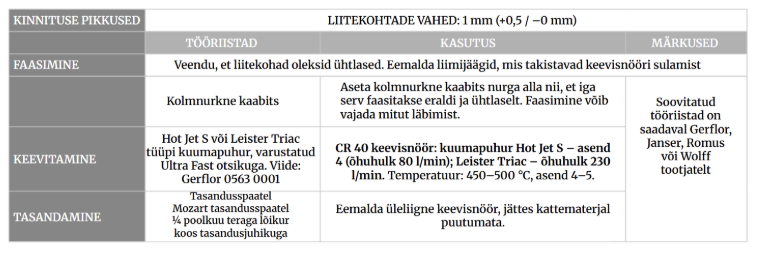
3.8 – Finishing – connection to building details (e.g. pipes, sockets, ventilation openings, fittings)
The wall covering must be carefully glued, cut and finished around the accessories to ensure a correct finish and avoid cracks or unevenness.
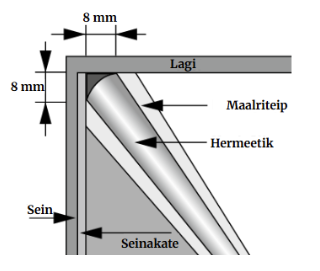
3.8.1 Sealing joints between Mural Ultra / ceiling
The sealant POLYMER MS 107 is used for sealing, and each part (ceiling/wall) must be covered with a sealing line at least 8 mm wide.
3.8.2 Wall-mounted accessories
Sink, washbasin, outer corner protection, hatch: POLYMER MS 107 sealant is used for sealing.
3.8.3 – Wall penetrations (heating, piping)
Water pipes: shower, sink – drain pipes – heating pipes: Sealant is used for sealing.
3.8.4 – Door and window frames
Sealant is used to seal door and window frames.
3.8.5 – Electrical installations
Switches and sockets
The installation must comply with current local standards. In France, the minimum distance from the electrical outlet to the fixed shower head or shower hose connection must be 1.20 m.
3.8.6 – Ventilation
Natural ventilation: low intake / high exhaust. Mechanical ventilation - wall exhaust: sealant is used for sealing.
3.8.7 – External corner protection
To protect the external corners, a stainless steel corner protector should be used, which is attached to the cut line with screws. This ensures the mechanical resistance of the wall covering and protects the corners from damage. 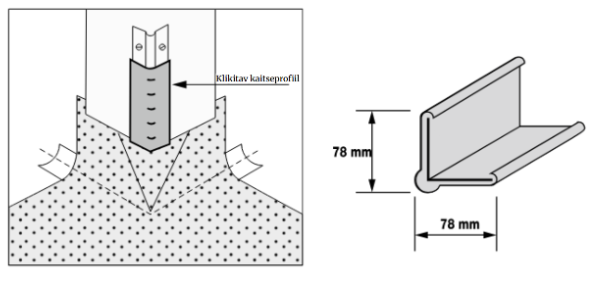
⚠️ Note:
The information in this document is current as of April 17, 2023 and is subject to change without notice. Due to ongoing technical improvements, customers should check that the document is still valid before commencing work.
Translated into Estonian using AI. If you have any doubts or problems with the translation, please refer to the original document.
Original document wall - installation guidelines